1 HTTP and Sessions
HTTP is a stateless protocol. This means that the protocol does not require the web server to remember anything from one request to the next. So calling the same URL from different clients will basically return the same result.
But this is not enough for many web apps we want to build: we want certain pages to only be available to some users. We want to offer shopping carts or wizards that let a user complete a complex action through several small steps, that carry over state.
In an old style GUI application running on windows or mac it is clear that that only one user is using the app at a time. We can use variables in main memory to store information pertaining to that user, and they will carry over through many interactions (opening a new window of our app, clicking a button, selecting something from a menu).
In a web app this is true for the frontend of the app, but only in a very limited sense: If you set a variable in javascript it will only be available for this one user in this one webbrowser. But if the user leaves your app by typing in a new URL, or following a link or just reloading the page this information will be lost.
In the backend we need some way to identify that a certain request comes from a certain user, and to carry over the state from one HTTP request to the next.
1.1 How to add state to HTTP
There are several ways to do this:
- HTTP Basic Authentication according to rfc 1945, section 11: The server sends a
WWW-Authenticate: Basic ...header in the first response. The browser asks the user for username and password, and then sends the (hashed) username and password to the server with subsequent request using the HTTP HeadersAuthorization: Basic .... - HTTP Cookies according to rfc 6265. The server sets the cookie (using the Header 'Set-Cookie'), the client returns the cookie automatically for every subsequent request to the server (using the HTTP Header
Cookie). - JSON-Web-Token according to jwt.io / rfc 7519 use a can be used in three ways:
- directly in HTTP with
Authorization: Bearer ...andWWW-Authenticate: Bearer ... - as a parameter in an URL
- as POST data
1.2 Security
If you use any of these methods over HTTP, unencrypted, then an attacker might be able to steal the authentication information. So always use HTTPS!
Both Authenticate-Headers and Cookies are sent automatically by the browser each time you access the web app. This can be used exploited by Cross Site Request Forgery attacks.
1.3 Session in Backend Development
Web frameworks use any of the methods described above to offer so called sessions to the developer: a session is a key-value store that is associated with the requests of one specific user.
Ruby on Rails by default sets a cookie named after the application.
In the screenshot below you can see the cookie set by the kanban
application as displayed by firefox developer tools in the
tab storage.

A Note on Security
The cookie is set with the HttpOnly option, which means it cannot be
changed by JavaScript in the browser. But it is still vulnerable to a
replay attack: we can read out the cookie in the developer tools.
Using curl on the command line we can send the stolen
cookie with a HTTP request and will be 'logged in' for that request:
curl -v --cookie "_kanban_session=bWdwc...d4c; path=/; HttpOnly" https://kanban-2.herokuapp.com/
...
<span>Logged in as mariam <a href="/logout">logout</a>
This makes it all the more important that the cookie can not be stolen! Remember to always use https if your app authenticates users at any point.
The Rails framework automatically sets and reads this cookie,
and offers a Hash session that is accessible from
both controllers and views. By default the keys and values you store
in the session hash are serialized, encrypted with a secret key and
sent as the value of the session cookie.
The cookie is not saved on the server.
This way of handling state works well with load balancers and multiple web servers.
Even without authentication, you can use the session to track a user as they browse through the web app. For example you could count how many requests they have already made:
# in app/controllers/application_controller.rb

  before_action :count_requests

  def count_requests
    session[:counter] = 0 if session[:counter].nil?
    session[:counter] += 1
  end
And show this number to the user
# in app/views/layouts/application.html.erb

  you have made <%= session[:counter] %> requests
  in session <%= session.id %>
See Rails Guide: Controller for more details.
2 Authentication
The session lets you recognize the same user from one HTTP request to the next. But it does not - in itself - help to authenticate users.
The most common way to achieve authentication is through passwords. For simple authentication with passwords there is a generator in Rails 8:
rails generate authentication
2.1 Password Storage
When storing passwords in a web app there are a lot of things you can do wrong: store the password as plain text, for example.
Rails comes with built in functions for handling passwords, which go a long way to following the OWASP recommendations.
Rails assumes that you have added bcrypt to the Gemfile
and have an attribute password_digest
in your model (and no attribute password).
2.2 has secure password
Add bcrypt to your Gemfile and bundle install.
Then add has_secure_password to your user model:
class User < ApplicationRecord
  has_secure_password
Now if you call
User.create({username: "mariam", password: 'badpassword123' })
The password will be encrypted, and only the encrypted version
will be stored in the database, in attribute password_digest.
It will add the authenticate method to your User model:
user = User.find_by(username: "mariam").authenticate("wrong password")
The authenticate method will encrypt the password again, and compare
it to the password_digest in the database. It will return nil if
the password does not match.
2.3 validates confirmation of password
It is good UX practice to have users supply their
password twice, to make it less likely that typos go through.
Rails also helps you with this: You can add validates_confirmation_of :password
to the user model:
class User <  ApplicationRecord
    has_secure_password
    validates :password, confirmation: true
Now the create-method is changed again: you need to supply the passwort twice to the create method:
> u = User.create({username: "yusuf",
                   password: 'badpassword123',
                   password_confirmation: 'badpassword1234'})
=> #<User id: nil, username: "yusuf", password_digest: [FILTERED], created_at: nil, updated_at: nil>
> u.save
=> false
> u.errors.messages
=> {:password_confirmation=>["doesn't match Password"]}
This use of create will not actually succeed, because the password_confirmation does not match the password.
This is the minimal user model we need:
class CreateUsers < ActiveRecord::Migration[5.1]
  def change
    create_table :users do |t|
      t.string :username
      t.string :password_digest

      t.timestamps
    end
  end
end
3 Basic Login
We now have all the bits and pieces to build a Login with username (or e-mail adress) and password.
There are some Rails convention around this:
- the current user should be accessible in controllers and views via a helper method
current_user, - logging in and logging out are seen as "creating a session" and "deleting a session" and handled by restful routes,
- there is a session controller and some views, but no session model!
3.1 Routes
Let's start by creating the routes:
# config/routes.rb:
  get  '/login',  to: 'sessions#new'     # show login form
  post '/login',  to: 'sessions#create'  # process login
  get  '/logout', to: 'sessions#destroy' # process logout
3.2 Controller
And the session controller to handle these routes:
rails g controller sessions new create destroy
Now you can direct your browser to http://localhost:3000/login
3.3 Login View
Next you need to set up the view for the login form there:
<!-- app/views/sessions/new.html.erb: -->

<h1>Log in</h1>

<%= form_with url: login_path, local: true do |f| %>

  <div>
    <%= f.label :username %>
    <%= f.text_field :username %>
  </div>

  <div>
    <%= f.label :password %>
    <%= f.password_field :password %>
  </div>

  <%= submit_tag 'Log In' %>

<% end %>
3.4 Session Controller
This form sends just two pieces of data: username and password.
So in the controller you have to extract these using params.permit.
If authentication goes through we store the user.id in the session.
Only the id is needed, we can load the rest of the user data
from the database.
app/app/controllers/sessions_controller.rb:
class SessionsController < ApplicationController

  # displays login form
  def new
  end

  # checks login data and starts session
  def create
    reset_session # prevent session fixation
    par = login_params
    user = User.find_by(username: par[:username])
    if user && user.authenticate(par[:password])
      # Save the user id in the session
      # rails will take care of setting + reading cookies
      # when the user navigates around our website.
      session[:user_id] = user.id
      redirect_to root_path, notice: 'Logged in'
    else
      redirect_to login_path, alert: 'Log in failed'
    end
  end

  # deletes sesssion
  def destroy
    reset_session
    redirect_to root_path, notice: 'Logged out'
  end

private

  def login_params
    params.permit(:username, :password, :password_confirmation)
  end
end
3.5 Helpers
The helper_method current_user we define in
the application controller. If the user_id is not
set in the session or if the user with this user_id does not
exist (any more) we just return nil as the current_user.
<!-- app/app/controllers/application_controller.rb -->
def current_user
  if session[:user_id]
    @current_user ||= User.where(id: session[:user_id]).first
  end
end
helper_method :current_user
With the current_user helper method returning nil if
nobody is logged in we can also use it in the view
to display different things for logged in users and non logged in visitors:
<!-- app/views/layouts/application.html.erb -->
<% if current_user %>
  Logged in as <%= current_user.username %>
  <%= link_to "log out", logout_path %>
<% else %>
  <%= link_to "log in", login_path %>
  | <%= link_to "register", new_user_path %>
<% end %>
To register a user - to create a new user - we can create a full scaffold for the user model, or build the controller and views by hand.
We really only need two actions:
# routes.rb
resources :users, only: %i[new create]
4 Better Login UX
If your app deals with more than just one or two users
that you set up "by hand", the gem devise can help you a lot.
It can makes your logins ...
- Confirmable: sends emails with confirmation instructions and verifies whether an account is already confirmed during sign in.
- Recoverable: resets the user password and sends reset instructions.
- Registerable: handles signing up users through a registration process, also allowing them to edit and destroy their account.
- Rememberable: manages generating and clearing a token for remembering the user from a saved cookie.
- Trackable: tracks sign in count, timestamps and IP address.
- Timeoutable: expires sessions that have not been active in a specified period of time.
- Validatable: provides validations of email and password. It's optional and can be customized, so you're able to define your own validations.
- Lockable: locks an account after a specified number of failed sign-in attempts. Can unlock via email or after a specified time period.
See the devise documentation on how to set it up.
When set up correctly devise gives you helper methods to use in your controllers and views:
current_useruser_signed_in?# to check if a user is signed in (in views and controllers)before_action :authenticate_user!# to make a controller only accessible to authenticated users
It also adds new routes to your app:
                  Prefix Verb   URI Pattern              Controller#Action
        new_user_session GET    /users/sign_in           devise/sessions#new
            user_session POST   /users/sign_in           devise/sessions#create
    destroy_user_session DELETE /users/sign_out          devise/sessions#destroy
       new_user_password GET    /users/password/new      devise/passwords#new
      edit_user_password GET    /users/password/edit     devise/passwords#edit
           user_password PATCH  /users/password          devise/passwords#update
                         PUT    /users/password          devise/passwords#update
                         POST   /users/password          devise/passwords#create
cancel_user_registration GET    /users/cancel            devise/registrations#cancel
   new_user_registration GET    /users/sign_up           devise/registrations#new
  edit_user_registration GET    /users/edit              devise/registrations#edit
       user_registration PATCH  /users                   devise/registrations#update
                         PUT    /users                   devise/registrations#update
                         DELETE /users                   devise/registrations#destroy
                         POST   /users                   devise/registrations#create
   new_user_confirmation GET    /users/confirmation/new  devise/confirmations#new
       user_confirmation GET    /users/confirmation      devise/confirmations#show
                         POST   /users/confirmation      devise/confirmations#create
You will propably want to link to new_user_session_path for login,
destroy_user_session for logout and new_user_registration for registering
a new user.
5 OAuth and OpenID Connect
In many scenarios it might be more convenient for your users to not have to register on your site, but to use another service to authenticate. That way they don't have to remember another password. And you might not have to handle passwords at all.
You can achieve this with Open Authentication, or OAuth for short. It is a standard for requesting Authentication and Authorization from a priovider. If you only use OAuth for Authentication, not Authorization, then you can use OpenID Connect on top of OAuth.
OpenID Connect can also be used with ID Austria.
5.1 Rails and OAuth
The gem omniauth helps you deal with OAuth2, OpenID, LDAP, and many
other authentication providers.
The list of strategies
is quite impressive. Think carefully about what services your users
are using, and which services might be useful to your app: could
you use Dropbox to authenticate, and also to deliver data directly
to your user's dropbox? Would it make sense to use Facebook or Twitter and also
send out messages that way? Or are your users very privacy conscious and
want to avoid Facebook and Google?
5.2 Providers
You will need the Gem omniauth and
additional gems for each provider. For example if you
want to use both Github and Stackoverflow for your web app geared
towards developers, you would need three gems:
gem 'omniauth'
gem 'omniauth-github'
gem 'omniauth-stackoverflow'
You need to register your app with the authentication provider, eg. at https://developers.facebook.com/apps/ or https://apps.twitter.com/. You have to specify the URL of your web app, and a callback URL:
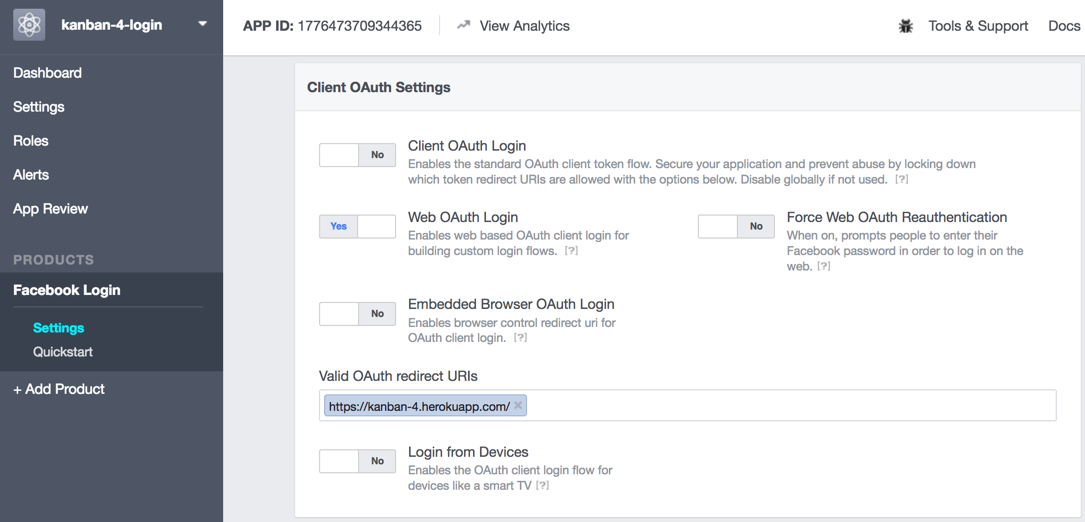
There might also be a review process involved which might take a few business days to go through.
You get back two pieces of information: a key and a secret. In Twitter this looks like this:
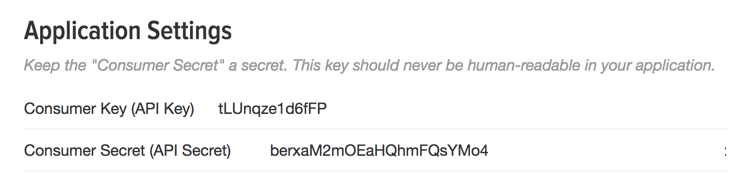
(A word of warning: if you change the configuration in developers.facebook.com then
you will get a new key and secret!)
You need to add the key and the secret to the configuration of omniauth:
# config/initializers/omniauth.rb:

Rails.application.config.middleware.use OmniAuth::Builder do
  provider :twitter, 'TWITTER_KEY', 'TWITTER_SECRET'
end
If you plan on publishing your source code you might want to set these values in a way that is NOT saved to the repository. You could use environment variables for that:
# config/initializers/omniauth.rb:

Rails.application.config.middleware.use OmniAuth::Builder do
  provider :twitter, ENV['TWITTER_KEY'], ENV['TWITTER_SECRET']
end
Then you can set the environment variables locally on the command line:
TWITTER_KEY=abc
TWITTER_SECRET=123
If you deploy to heroku or dokku, use the command line interface to set the variables there:
heroku config:set TWITTER_KEY=abc
heroku config:set TWITTER_SECRET=123

dokku config:set TWITTER_KEY=abc
dokku config:set TWITTER_SECRET=123
5.3 Models
For authentication you need to save at least the provider name and the uid in your database somewhere. In the simplest case you just save them in a user model:
rails g model user provider uid
To use additional services and get additional info from the provider you also need to save a per-user token and secret:
rails g model user provider uid token secret
If you want to enable that one user can log in via different providers and still be recognised as the same user, you need to create a user model with a has_many relationship to an authentiation model that stores provider and uid.
But we will stick to the simple version:
class CreateUsers < ActiveRecord::Migration[5.0]
  def change
    create_table :users do |t|
      t.string :provider
      t.string :uid
      t.timestamps
    end
  end
end
5.4 Login and Logout
Omniauth is a "Rack Middleware". That means it is somewhat independent
of the Rails app you are building. It has access to the HTTP request, will
analyze that, and pass on data to your Rails app through the
environment variable omniauth.auth.
To log in you send the user to /auth/:provider (e.g. /auth/facebook).
<!-- app/views/layouts/application.html.erb -->
  <% if current_user %>
    Logged in as <%= current_user.name %>
    <%= link_to "log out", logout_path %>
  <% else %>
    log in with <%= button_to "twitter", "/auth/twitter", method: :post, data: {turbo: "false"} %>
  <% end %>
This URL is handled by omniauth, not by your Rails app. Omniauth will send
the user's browser on to a URL at the provider. There the user can log in. After
that the browser is redirected to your app again, to /auth/:provider/callback
This URL you need to map to a session controller:
# config/routes.rb:
match '/auth/:provider/callback', to: 'sessions#create',  via: [:get, :post]
match '/auth/failure',            to: 'sessions#failure', via: [:get, :post]
In the session controller you can now read the data that omniauth provides from the environment variable.
As a first step you could just print it out, to see what data is provided:
def create
  render text: "<pre>" + env["omniauth.auth"].to_yaml and return
end
The data always contains values for provider and uid at the
top level. There may be a lot more data.
Here some example data from a twitter login:
provider: twitter
uid: '8506142'
info:
  nickname: bjelline
  name: Brigitte Jellinek
  ...
Now let's look at session#create:
There are two basic cases to consider: either the user has logged in using
this authorisation method before (then we should find them in our database),
or they are logging in for the first time.
This can get quite involved, so we hide it away inside the user model:
def create
  user = User.find_or_create_with_omniauth(request.env['omniauth.auth'])

  if user
    session[:user_id] = user.id
    redirect_to root_path, notice: 'Logged in'
  else
    redirect_to login_path, alert: 'Log in failed'
  end
end
In the model we pick apart the information from omniauth:
# app/model/user.rb

def self.find_or_create_with_omniauth(auth)
  # look for an existing authorisation
  # provider + uid uniquely identify a user
  User.find_or_create_by!(
    provider: auth['provider'],
    uid:      auth['uid']
  )
end
The ActiveRecord method find_or_create_by handles both cases in one: either it
finds an existing user or it creates a new one.
We don't really have a name for each user, but we can fake that in the model:
# app/model/user.rb
def name
  "#{uid}@#{provider}"
end
6 See Also
This authenticaiton with cookie is just one of many possible Authentication Methods you could use for your App. See Advanced Authentication for an overview of other methods.