3 Chat Example
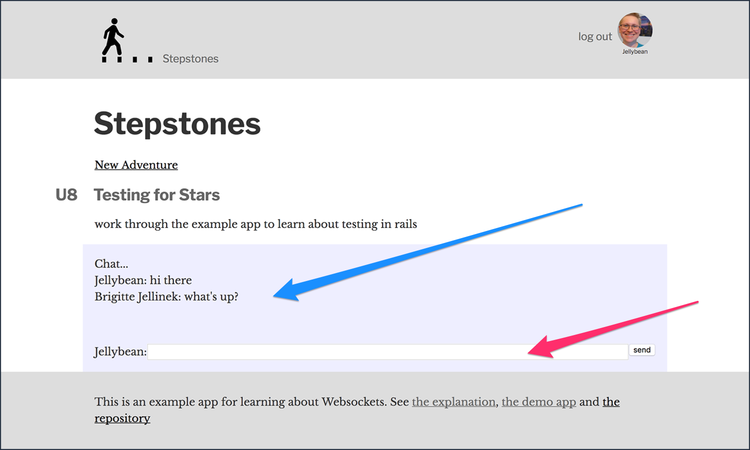
In our example app several users should be able to chat with each other, no matter which page of the app they are currently viewing.
We will build the app starting from the client side:
3.2 Server accepts and Authentication
The server side code is stored in the folder app/channels. We first
take a look at app/channels/application_cable/connection.rb, which was
created by rails:
module ApplicationCable
  class Connection < ActionCable::Connection::Base
  end
end
Remember that the server side code concerning websocket is not
called by a controller. So even if we already built authentication
into our app, and added code for current_user to application_controller.rb,
the current_user will not be available here in the ApplicationCable.
But we do have access to cookies in Actioncable:
module ApplicationCable
  class Connection < ActionCable::Connection::Base
    identified_by :current_user    # creates a instance variable

    def connect
      Rails.logger.warn("this is the info I read from the cookie:")
      Rails.logger.warn(cookies.encrypted[Rails.application.config.session_options[:key]])
      self.current_user = User.find(3)
    end

    def disconnect
      # Any cleanup work needed when the cable connection is cut.
    end
  end
end
After adding this code the browser should be able to connect to the websocket. In Firefox with the extension Websocket Monitor you can see the messages sent across the websocket in a separate tab:
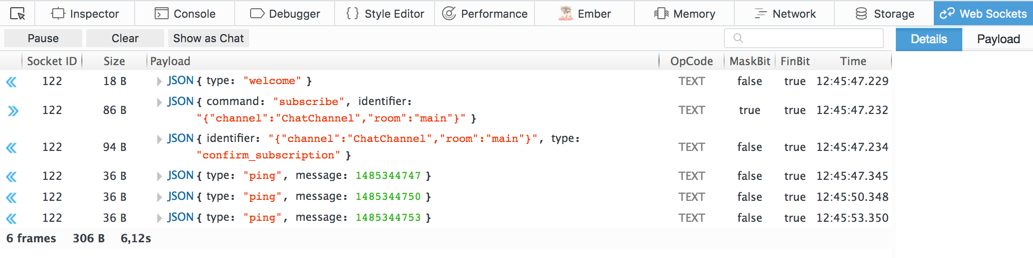
You can see that there is more going on than just the subscription that we initiated from the client side.
On the server side you will see the connection in the log file:
Started GET "/cable" for ::1 at 2017-01-25 17:45:09 +0100
Started GET "/cable/" [WebSocket] for ::1 at 2017-01-25 17:45:09 +0100
Successfully upgraded to WebSocket (REQUEST_METHOD: GET, HTTP_CONNECTION: keep-alive, Upgrade, HTTP_UPGRADE: websocket)
this is the info I read from the cookie:
{"session_id"=>"b8ee74d5afe32d5", "_csrf_token"=>"9mBRsEoGnRnkkW6", "user_id"=>"3"}
We successfully decoded the session data from the encrypted cookie, you can see
that the user_id is 3 in this case. We can use this to set the current_user correctly:
module ApplicationCable
  class Connection < ActionCable::Connection::Base
    identified_by :current_user    # creates a instance variable

    def connect
      session_from_cookie = cookies.encrypted[Rails.application.config.session_options[:key]]
      user_id = session_from_cookie['user_id']
      reject_unauthorized_connection if user_id.nil?
      self.current_user = User.find(user_id)
      Rails.logger.warn("connection for user #{current_user}")
      reject_unauthorized_connection if current_user.nil?
    end

    def disconnect
      # Any cleanup work needed when the cable connection is cut.
    end
  end
end
After this, a user that has logged in to the rails app is automatically also logged in to the websocket, as you can see in the log file:
Started GET "/cable" for ::1 at 2017-01-25 17:54:51 +0100
Started GET "/cable/" [WebSocket] for ::1 at 2017-01-25 17:54:51 +0100
Successfully upgraded to WebSocket (REQUEST_METHOD: GET, HTTP_CONNECTION: keep-alive, Upgrade, HTTP_UPGRADE: websocket)
  User Load (0.3ms)  SELECT  "users".* FROM "users" WHERE "users"."id" = $1 LIMIT $2  [["id", 3], ["LIMIT", 1]]
connection for user Brigitte Jellinek
Registered connection (Z2lkOi8vc3RlcHN0b25lcy9Vc2VyLzM)
ChatChannel is transmitting the subscription confirmation
ChatChannel is streaming from chat_main
Now the server is ready to receive data from this client and send data to this client.
3.3 Client sends data
To implement the chat we can use the already existing HTML in application.html.erb:
<section id="chat" class="holder" style="display:none;">
  <div id="output">
    <p>Chat...</p>
  </div>
  <div id="input">
    <span><%= current_user %>: </span>
    <input name="chat" type="text">
    <input type="button" value="send">
  </div>
</section>
We just have to make it visible as soon as we have a websocket connection.
We change app/assets/javascripts/channels/chat.js, adding a second
argument to subscriptions.create: an object that holds a connected-function:
// create(channelName, mixin)
App.chatChannel = App.cable.subscriptions.create({
  channel: 'ChatChannel',
  room: 'main'},
  {
    connected: function() {
      $('#chat').show();
    }
  }
);
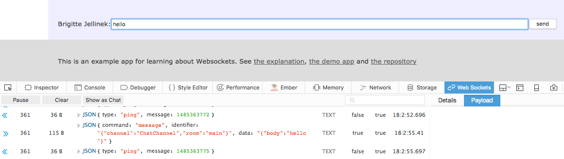
If a user types something into the chat-input field and presses enter or the send button, we want the text to be sent across the websocket:
$(function() {
  function send_chat() {
    var text = $('#input input[name=chat]').val();
    $('#input input[name=chat]').val('');
    App.chatChannel.send({ body: text });
  }

  $('#input input[name=chat]').on('keypress',function (e) {
    if (e.which == 13 || e.keyCode == 13) {
      send_chat();
    }
  });

  $('#input input[type=button]').on('click', send_chat);
});
If you type in 'Hello' and send it, you can see the message being sent in the websocket tab of firefox developer tools:
4 Progress Example
For the second example the communication structure is a bit more complex: All the users in one adventure should see each other progress through the steps.
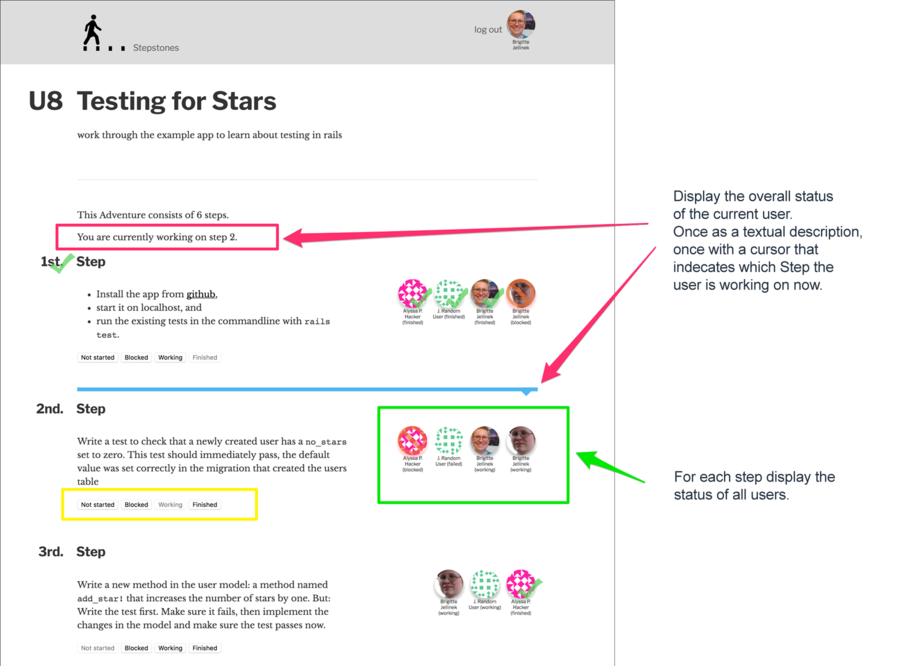
The page displays the adventure and the three steps it consists of.
The currently logged in user is 'Brigitte Jellinek'. Her progress is described at the top of the page (purple box) as "You are currently working on step 2.". A blue cursor just above step 2 also indicates this.
At every step we can see the status of all users. For example at the 2nd step, in the green box, we can see the status of four users. We can see that Alyssa P. Hacker is blocked.
Inside the yellow box we find the interface the current user can use to change their status at step 2.
We will use websockets to communicate changes to all users. So if Alyssa changes her status from blocked to finished, the server will send websocket messages to all the other users currently viewing the page, and their display will change accordingly.
Contrast this to a classic web app built with HTTP requests, where you would need to reload the page to get the new status.
4.1 Client subscribes
There is no need to change anything in app/assets/javascripts/cabel.js. We
add another file to the channels folder app/assets/javascripts/channels/adventure.js:
App.cable.subscriptions.create({ channel: "AdventureChannel" })
In channels/chat.js we also set a room when creating the subscription,
and we used the same room for all users. This time we want to treat users
who are working on different adventures differently.
One simple way of doing this is to supply the URL of the current page as a parameter when creating the subscription:
App.adventureChannel = App.cable.subscriptions.create({
  channel: "AdventureChannel",
  url_path: document.location.pathname
});
The path is communicated via websocket:

4.5 Client recieves data: partial as html
The display of all the users status involves a lot of html and additional resources.

There is already a separate partial to handle this, it is
called in the adventures/show.html.erb view repeatedly:
<% @stepstones.each_with_index do |stepstone, i| %>
  <div id="step_<%= i %>">
    <h2>
      <span class="number"><%= (i + 1).ordinalize %>.</span> Step
    </h2>
    ...
    <article>
      ....
      <div id="step_<%= i %>_show_status" class="step_show_status">
        <%= render 'stepstones/show_status', stepstone: stepstone, i: i %>
      </div>
    </article>
  </div>
<% end %>
We can reuse the stepstones/show_status partial on the server side,
when we send the message to the websocket. And we can reuse the
div with id step_3 on the client side, when we incorpoarte the
recieved html into the page.
We will add two new keys to the message, which now looks like this:
{
  "description": "Alyssa P. Hacker is now blocked at the 2nd step.",
  "selector": "#step_1_show_status",
  "html" : "<div class=\"user blocked\"><span><img...> ....</div>\n"
}
On the server we add another key/value pair to message:
  def notify_adventure_channel
    ActionCable.server.broadcast(
      url_helpers.adventure_path(stepstone.adventure),
      description: describe_new_state,
      selector: "#step_#{i}_show_status",
      html:
        ApplicationController.renderer.render(
          partial: 'stepstones/show_status',
          locals: { stepstone: stepstone, i: i }
        )
    )
  end
on the client we just use jQuery to replace the html inside the div:
received: function(data) {
  $(data.selector).html(data.html);
  $("#output").append('<p>' + data.description + '</p>');
}
Now the status-display with all the users should work!