Issue Lifecycle

Software development in long-running projects is often organized around issues. After reading this you will...


1 The Issue Lifecycle: Beginning

The top level view just the issue:

  1. Define the Issue: The problem (bug) or new requirement (feature/story) is given a clear description
  2. A developer picks up the issue
  3. Somehow it is implemented (details unclear on this level)
  4. Somehow it is prepared for manual testing (details unclear on this level)
  5. Now the implementation can be tested in the browser, and compared to the issue
  6. If the implmentation is accepted the issue is closed, otherwise return to step 2

1.1 Example Issue

Let's look at a simple example issue from a Ruby on Rails project:

Issue #3: For admin users, show a Dashboard at '/admin' and display the number of Stamps

It is very short and simple. Maybe it is the first Issue that other Issues are then based on? Maybe there are Issue #4, #5, #6 that add more Data to the dashboard?

Maybe the issue was created by developers, when they broke up a longer user story into smaller pieces.

2 The Git Workflow: Beginning

The next level concerns the git workflow:

  1. after picking the issue the developer creates a feature branch and a merge request. the merge request is set to "draft" status.
  2. then the issue is implemented (details unclear on this level)
  3. when the developer thinks the implementation is done, they remove the "draft" status
  4. now another developer does a code review
  5. if changes are needed we go back to step 2.
  6. now the feature branch can be deployed to the staging server, where it is available for manual testing.
  7. if problems are found in manual testing we go back to step 2.
  8. if the implementation is accepted the feature branch kann be merged and deployed to production

2.1 Creating a branch

To create the feature branch the developer picks a name, and uses git on the command line to create the branch:

git checkout -b feature_dashboard_issue_3

There might be a convention in place about naming branches.

The branch can be pushed to the git server immediatly:

git push origin feature_dashboard_issue_3

2.2 Creating a merge request

Creating the merge request can be done through the web interface. For example when pushing a new branch to gitlab, you will get a reply that includes a URL for that.

remote: To create a merge request for feature_dashboard_issue_3, visit:
remote:   https://gitlab.example.com/groupname/projectname/-/merge_requests/new?merge_request%5Bsource_branch%5D=feature_dashboard_issue_3

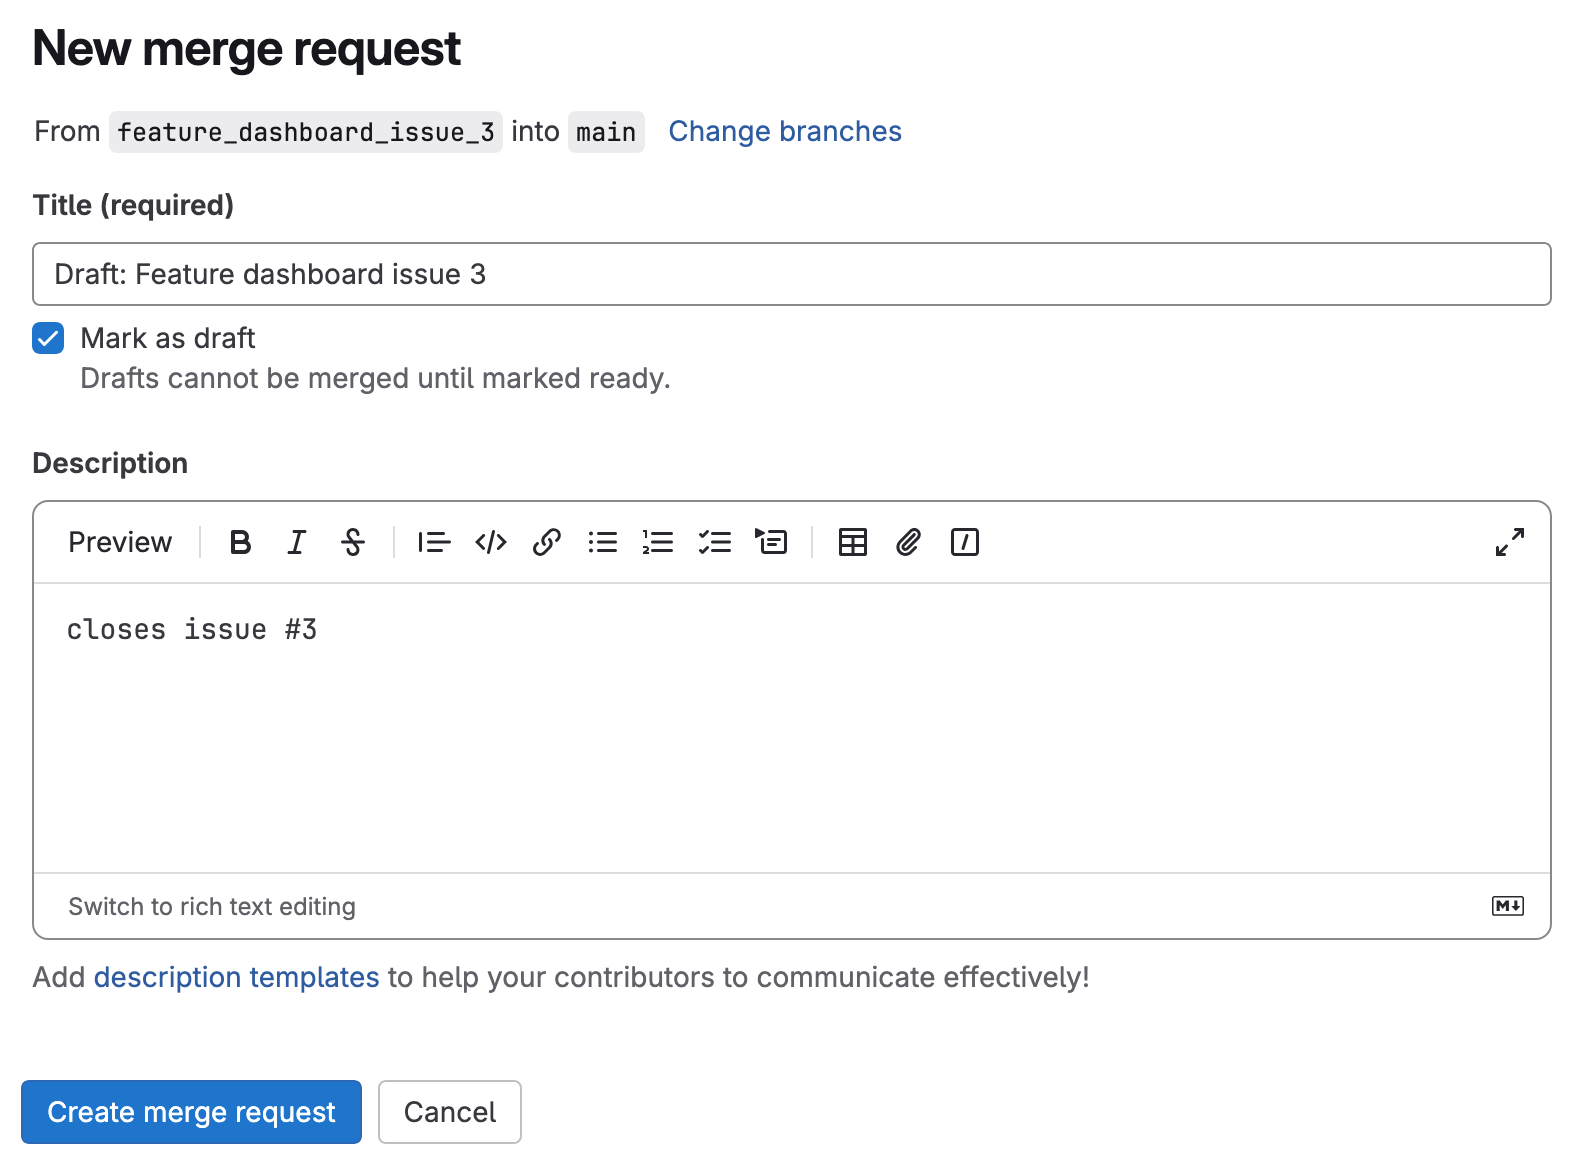
2.3 The merge request in the Browser

This is what creating a merge request looks like. The screenshot shows two important details:

  • be sure to activate the checkbox "Mark as draft"
  • in the description, you can reference Issues by their number

2.4 Working with the merge requst

The merge request compares your feature branch to the main branch. You can add commits now or later on - the merge request will always show the latest version.

3 Test Driven Development

Zooming in to step 2 "the issue is implemented", we can see the cycle of test driven development. If we are implementing an issue that delivers value to the user, we should start with system tests:

  1. break the issue up into a list of possible system tests - but don't implment anything yet
  2. implement the simplest system test from your list - if you run your test suite now, your test ist red
  3. implement just enough to make the new test (and all the existing tests) pass (green)
  4. commit and push
  5. refactor if you think it's necessary. all the tests still pass.
  6. commit and push
  7. are you done with the whole issue? if not go back to step 1

3.1 Example System Test

Let's look at the example issue:

Issue #3: For admin users, show a Dashboard at '/admin' and display the number of Stamps

There are several aspects that we could turn into system tests:

  1. Only admin users should have access to the url '/admin'
  2. i expect the heading "Dashboard" to be on the page
  3. i expect the number of stamps to be on the page

Which one is the most simple to implement? Probably number 2.

3.2 Implementing a System Test in Rails

Let's look for a place to put the system test. Take a look at the files tests/system/*_test.rb.

Maybe we should create a new test file for the Dashboard. There is a generator that could do that:

rails generate system_test AdminDashboard

It will create just one file:

require "application_system_test_case"

class AdminDashboardsTest < ApplicationSystemTestCase
  # test "visiting the index" do
  #   visit admin_dashboards_url
  #
  #   assert_selector "h1", text: "AdminDashboard"
  # end
end

Or you could copy an existing file with system tests, and take some inspiration from existing code. The first system test could look like this:

class AdminDashboardsTest < ApplicationSystemTestCase
  test 'visit the dashboard' do
    visit '/admin'
    assert_selector 'h1', text: 'Admin Dashboard'
  end
end

3.3 System Test - Red

When running the system tests in the terminal:

rails test:system

the new test will fail:

[Screenshot Image]: ...project/tmp/screenshots/failures_test_visit_the_dashboard.png
F

Failure:
AdminDashboardsTest#test_visit_the_dashboard [test/system/admin_dashboards_test.rb:13]:
expected to find text "Admin Dashboard" in "Routing Error\nNo route matches [GET] "/admin"

For implementing this feature we can use different methods. In this simple case, "Browser Driven Development" might be good.

4 Browser Driven Development

To get a system test to pass we sometimes need to build up a new webpage, or a new view in an MVC system. Then it makes sense to switch to "browser driven development" for the implementation.

By using the browser in every step we make sure that all the parts of the system fit together. finally we reach a stage where the system test passes.

This also works for creating new REST API endpoints, just that the goal is seeing the right JSON output in the browser, not a webpage.

4.1 Example: Missing route

In Rails this could look like this:

Open the browser to the (new) route '/admin' and see the first error:

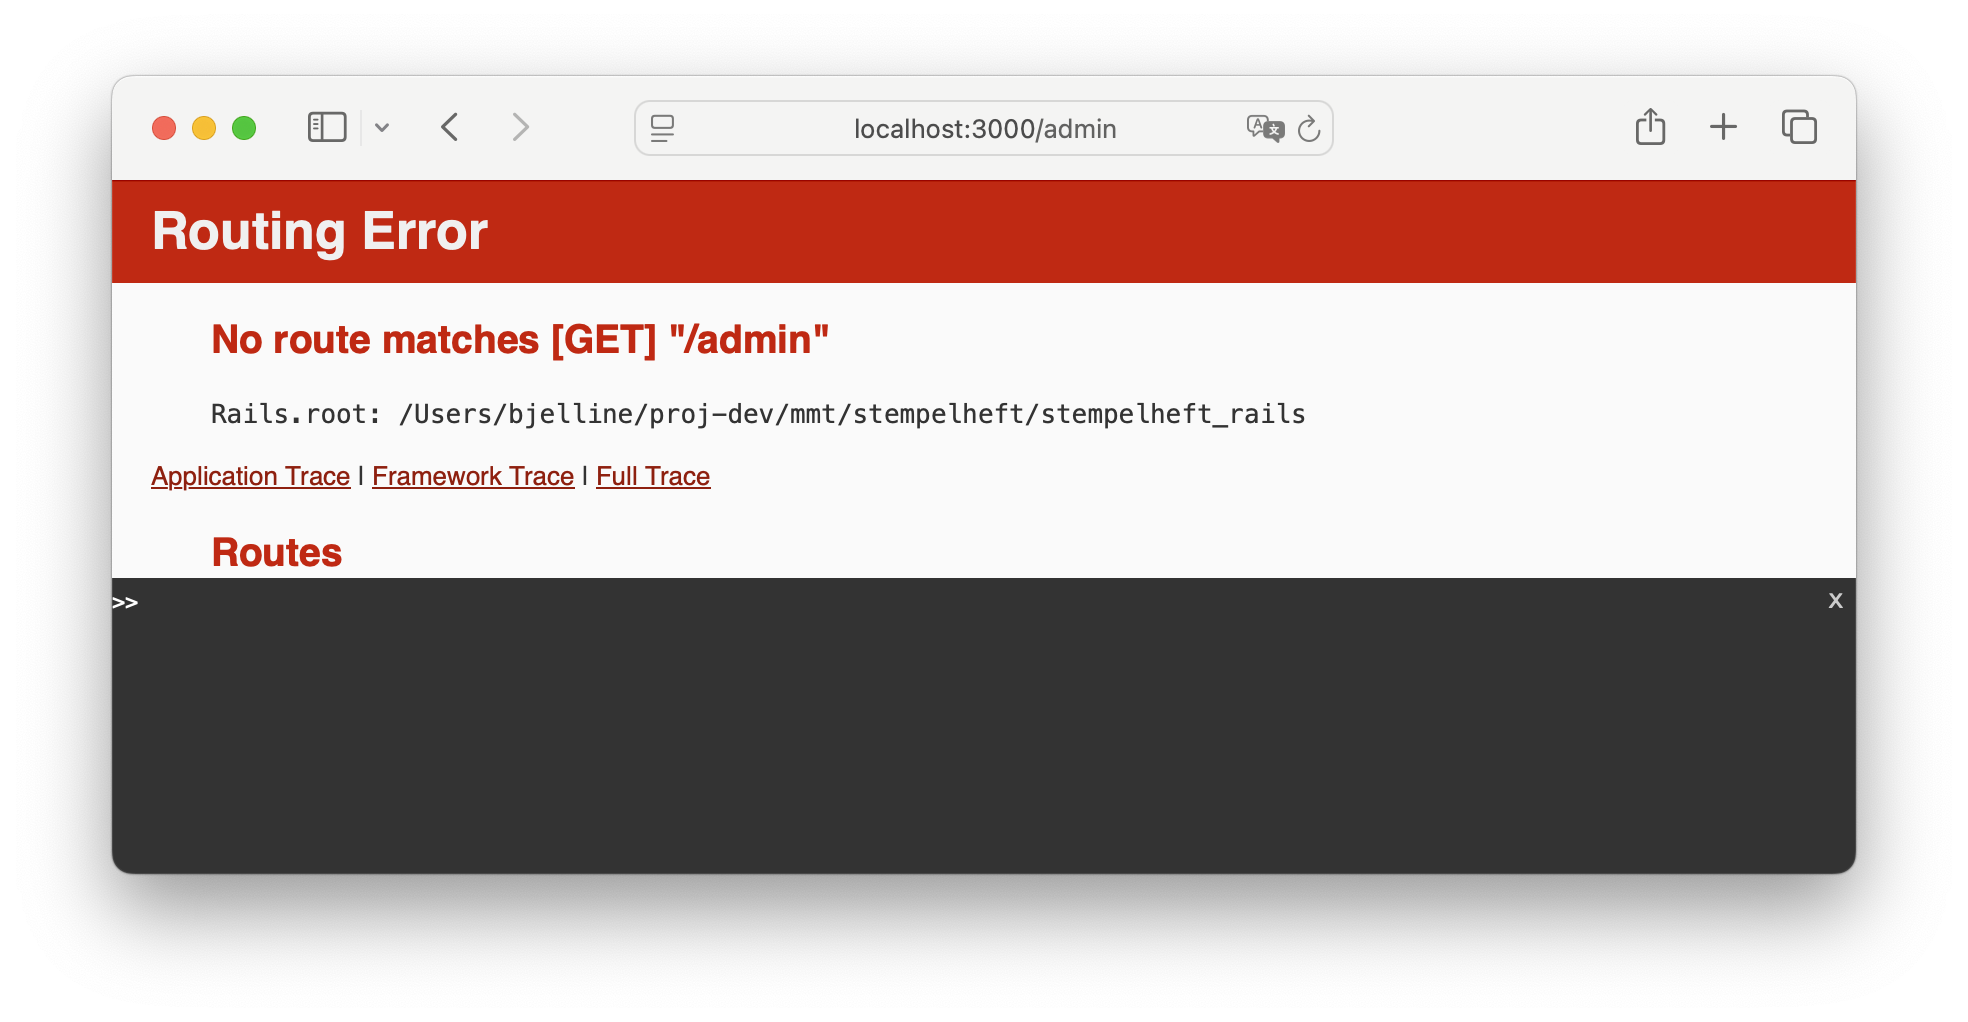
To define the missing route, we edit the file config/routes.rb. Read the already existing routes and find a good place to fit in the new route.

In this case there is already a PagesController for pages that are not connected to one specific model. This is where the new route can fit in:

# file config/routes.rb
# ...
  get '/about', to: 'pages#index'
  get '/calendar_subscription', to: 'pages#calendar_subscription'
  get '/admin', to: 'pages#admin'   # new route

4.2 Example: Missing Controller Action

Now reload the page '/admin' to see the new error:

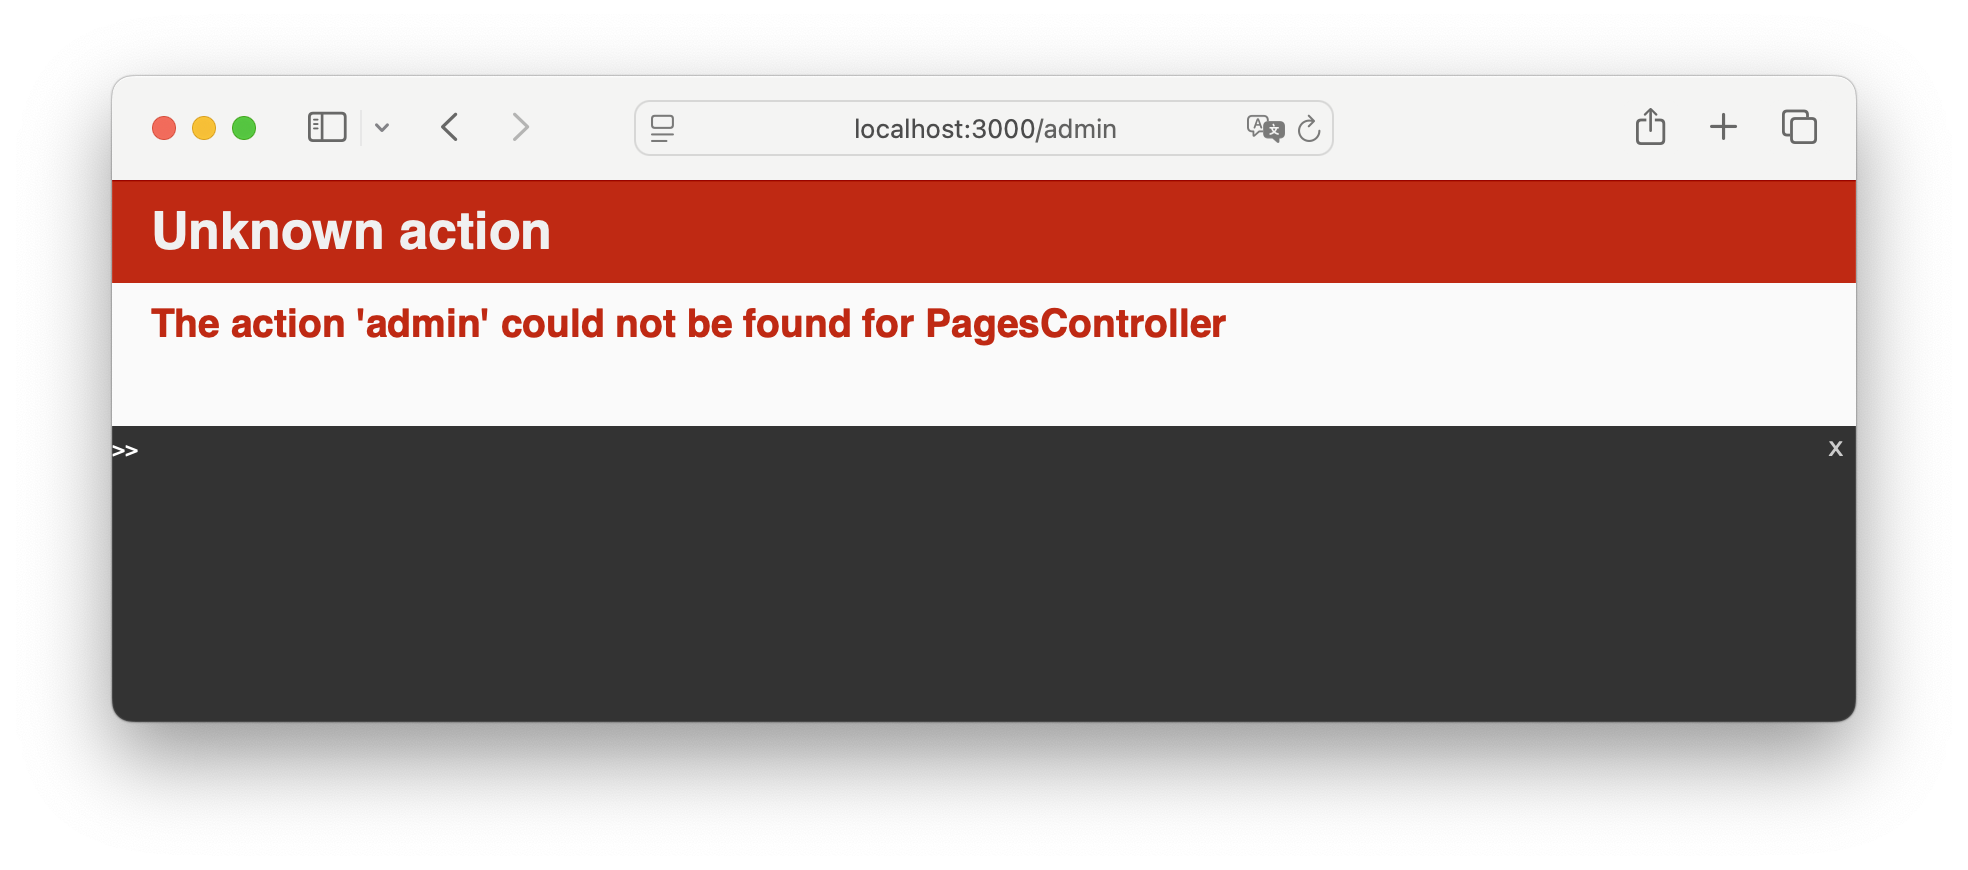
So the route and the PagesController exist, but there is not action 'admin' there.

Let's go to app/controllers/pages_controller.rb and define a new method admin:

class PagesController < ApplicationController

  def admin; end

...

4.3 Example: Missing View Error

Now reload the page '/admin' again to see the new error:

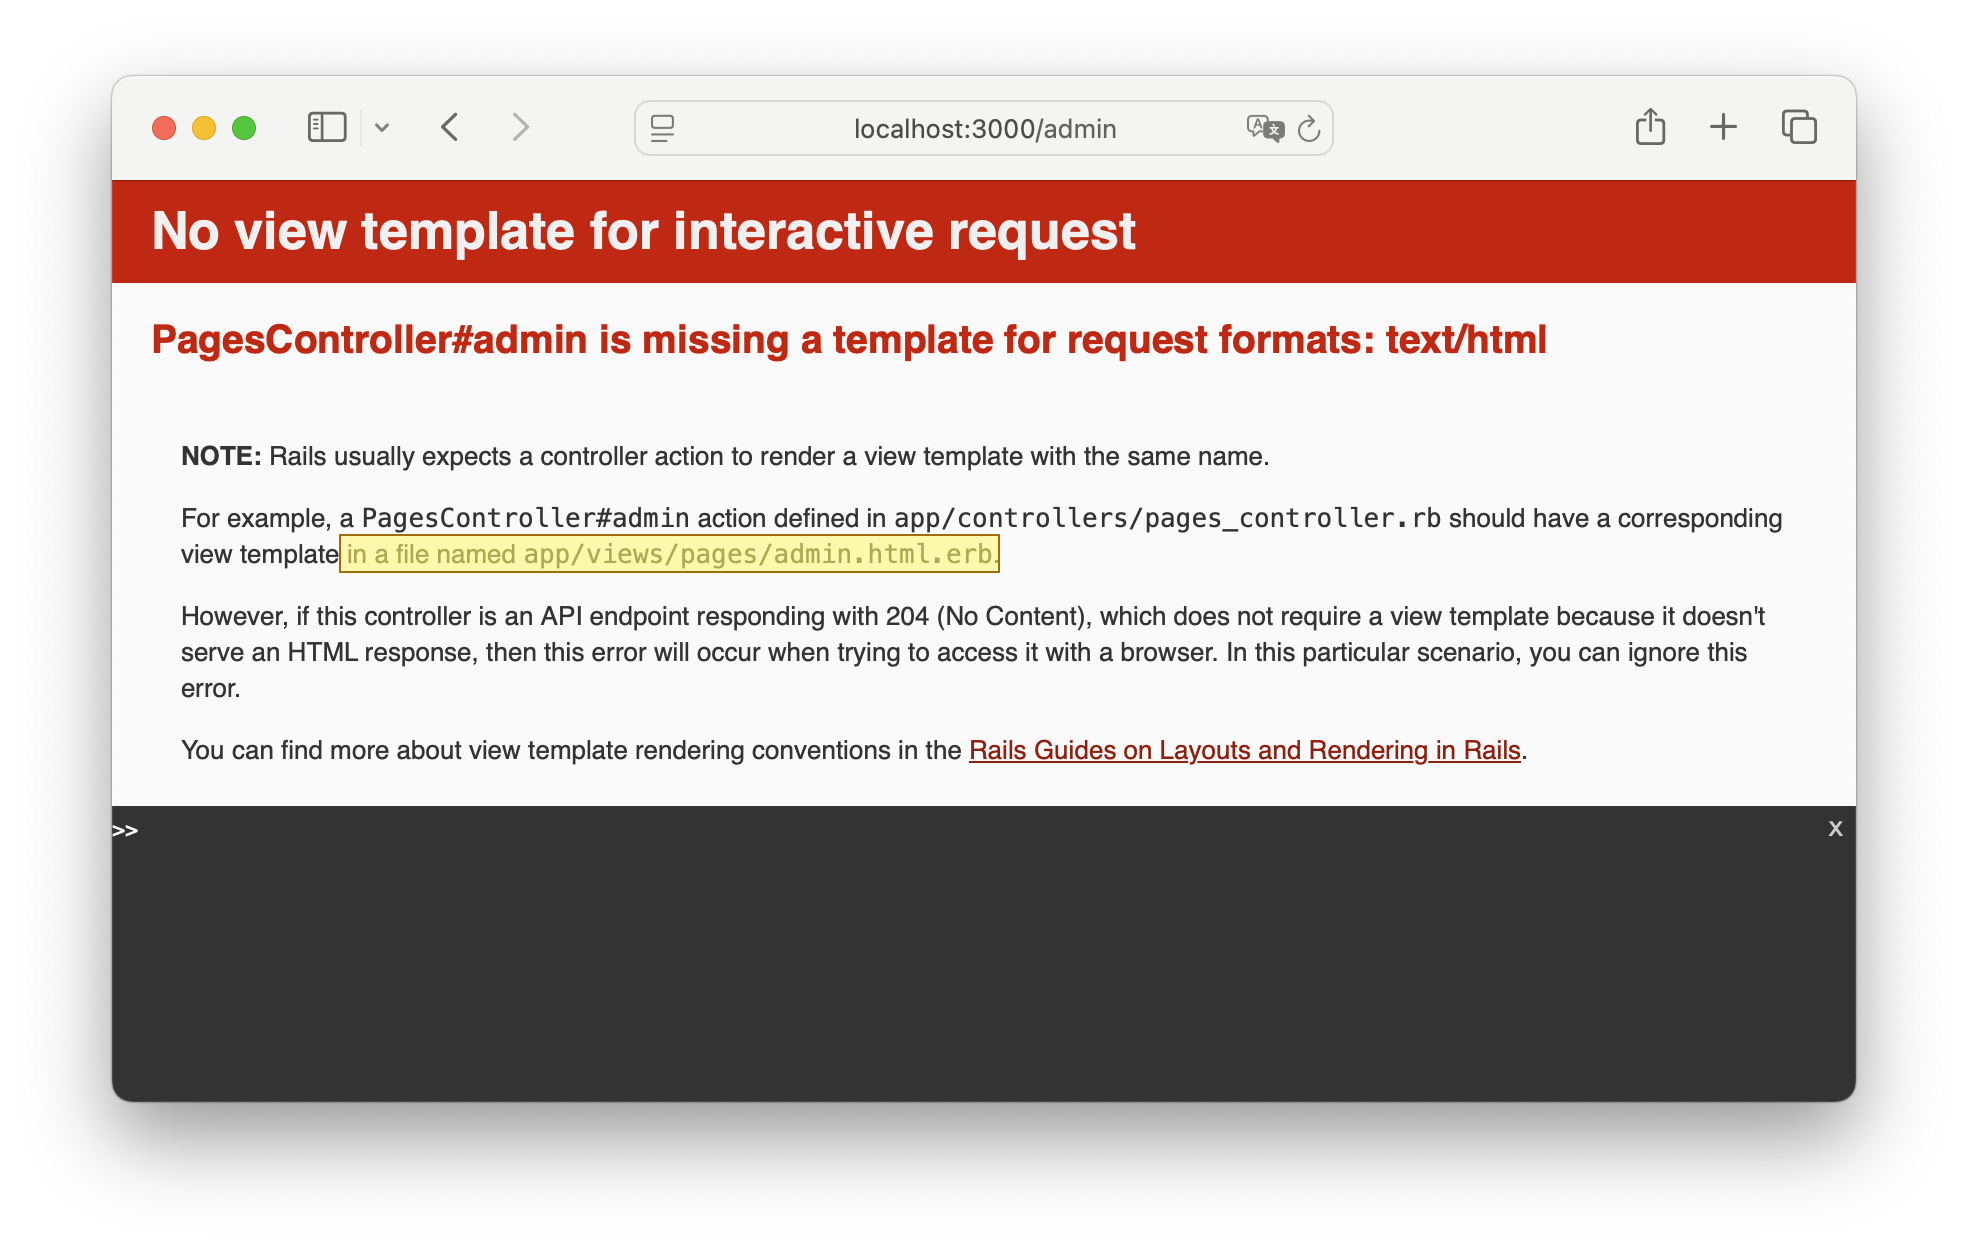
The error message is very specific, it tells us which view file to create.

Let's create this file:

<h1>Admin Dashboard</h1>
...nothing here yet...

4.4 Example: System Test Green

This version of the code already fulfilles the system test we wrote. So we are done with "Browser Driven Developmernt".

Now is a good time to commit and push!

5 TDD Inner Cycle

To get a system test to pass we sometimes need to add code to different classes. In this case it makes sense to do an "inner cycle" of TDD. This will sound very similar to the TDD Cycle we used with system tests, but this time it is concerned with unit tests:

  1. Think of all the parts you might need to fulfill the system test, and how you would test each of them - but don't implement anything yet
  2. pick the simplest part, and the simplest unit test for it, and write that unit test. (red)
  3. implement it (green)
  4. commit and push
  5. refactor if you think it's necessary. all the tests still pass.
  6. do you have all the pieces neded to get the system test to pass? if not, go back to 1

While doing this "inner cycle" of TDD you build up the pieces and finally the whole functionality necessary to get the system test to pass.

5.1 Example: Display Number of Stamps

Let's go back to the "list of possible system tests" in our example:

  1. Only admin users should have access to the url '/admin'
  2. i expect the heading "Dashboard" to be on the page
  3. i expect the number of stamps to be on the page

Number 2 is already implemented.

Let's pick Number 3, write a system test for it, and then think about what we need to implment it.

class AdminDashboardTest < ApplicationSystemTestCase
  # ...
  test 'displays the number of Stamps' do
    visit '/admin'
    assert_text /\d+ stamps in total/
  end

5.2 Example: Where to put the code?

The projects contains a model Stamp. So we could use ActiveRecord Methods to count the number of Stamps: Stamp.all.count.

We could put this code into the view:

<h1>Admin Dashboard</h1>
<p><%= Stamp.all.count %> stamps in total.</p>

Or we could put the code in the controller, and then disply it in the view:

class PagesController < ApplicationController

  def admin
    @number_of_stamps = Stamp.all.count
  end

or we could put the code in the Stamp model, and just call a method in the controller:

class PagesController < ApplicationController

  def admin
    @number_of_stamps = Stamp.total_number
  end

The last version is best: the Stamp model should contain the business logic of stamps. In this case the logic is (still) simple. But there could be stamps that are not approved yet, and do not count. Or there could be stamps that are invalid, or outdated. This is business logic.

5.3 Example: Unit Test - Red

Let's write a unit test for the method of the Stamp model. test/model/stamp_test.rb already exists, we can just add a new test case.

  test 'the Stamp class knows how many stamps there are in total' do
    Stamp.delete_all
    assert_equal 0, Stamp.total_number
  end

This test seems radical: it deletes all the stamps from the database.

But this is not a problem: the test database is recreated for every single test. So if we delete something in the first test, it will be back for the second test. This is done using transactional rollback.

We can read the other tests in stamp_test.rb to find out how stamps can be created. We can use that knowledge to improve our test by haveing it create a new stamp and make sure it is counted:

  test 'the Stamp class knows how many stamps there are in total' do
    Stamp.delete_all
    assert_equal 0, Stamp.total_number

    student = User.first
    some_event = Event.first

    s = Stamp.create!(user: student, event: some_event)

    assert_equal 1, Stamp.total_number
  end

When we run this test now in the termine it is red:

Error:
StampTest#test_the_Stamp_class_knows_how_many_stamps_there_are_in_total:
NoMethodError: undefined method 'total_number' for class Stamp
    test/models/stamp_test.rb:66:in 'block in <class:StampTest>'

5.4 Example: Unit Test - Green

Now it's time to edit the stamp model app/models/stamp.rb:

class Stamp < ApplicationRecord
  belongs_to :user
  belongs_to :event

  # define the class method Stamp.total_number
  def self.total_number
    Stamp.all.count
  end

Now the unit test is green, there is no need to refactor, and we are done on the level of unit tests.

5.5 Example: Back to the System Test Cycle

We pop back up to the system test level, where the test is still red. To display the result of our method, we still have to call the method in the controller, set an instance variable that is available in the view, and then display the value in the view:

class PagesController < ApplicationController

  def admin
    @number_of_stamps = Stamp.total_number
  end
<h1>Admin Dashboard</h1>
<p><%= @number_of_stamps %> stamps in total.</p>

Now the system test is green.

6 Git Workflow: End

Let's have a look what happens after we are done with Test Driven Development: all systems test pass, all commits have been pushed to the merge request - wo we have no reached step 3:

  1. after picking the issue the developer creates a feature branch and a merge request. the merge request is set to "draft" status.
  2. then the issue is implemented (details unclear on this level)
  3. when the developer thinks the implementation is done, they remove the "draft" status
  4. now another developer does a code review
  5. if changes are needed we go back to step 2.
  6. now the feature branch can be deployed to the staging server, where it is available for manual testing.
  7. if problems are found in manual testing we go back to step 2.
  8. if the implementation is accepted the feature branch kann be merged and deployed to production

6.1 Example: Rebase

In a large team many feature branches are open in parallell. When you first start your feature branch (called "a3" in this diagram), you are up-to-date with main. You start working, and add commits to your own branch:

When you are ready to merge, it might be that main has moved on: Other features were finished and merged into main, and now main has new commits on it:

In this case you need to rebase your branch:

git checkout a3
git pull origin a3 # most current version of your feature branch
git rebase main
# fix problems, run test, fix problems again
git push -force-with-lease origin a3  # overwrite branch with rebased branch
# work on your merge request

The result is that your commits are modified, so that the happend after the commits on main:

Now your branch can be merged without problems.

6.2 Example: Remove Draft Status

After the implementation, it's a good idea to have a look at the issue again, and to make sure we covered everything described there.

We should also look at the changes in our merge request, and make sure that we did not include unneccessary changes, like these extra empty lines:

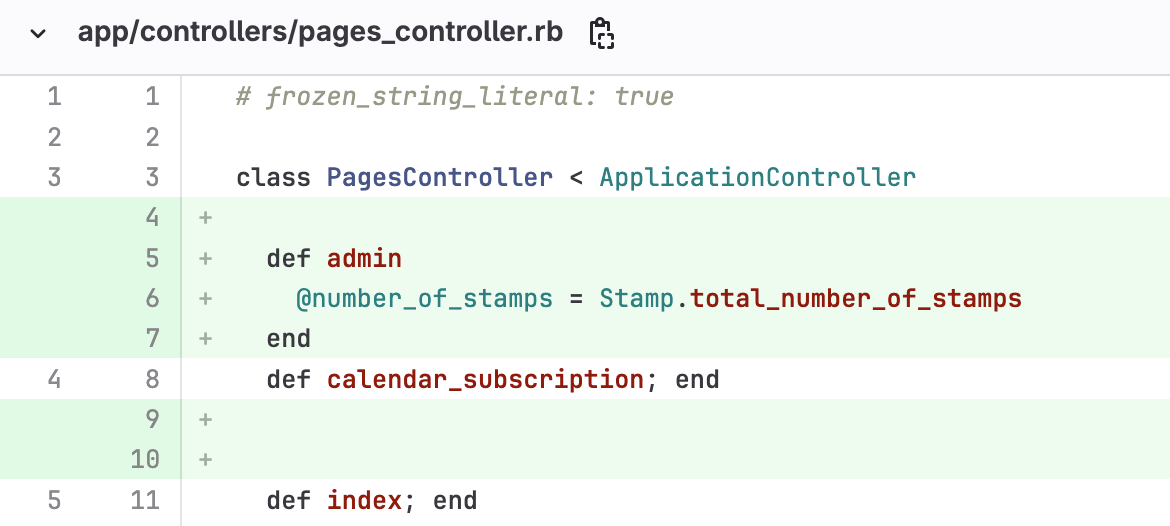
This is easy to fix: just remove them in your local code, commit and push again.

Then we can remove the "draft" checkbox on the merge request.

6.3 Example: Code Review

Now a differente developer in our team will do a code review of our code. Using git makes this very easy: They can see just the changes we made to the code, and don't have to search around in the whole codebase.

They can add comments directly in the code:

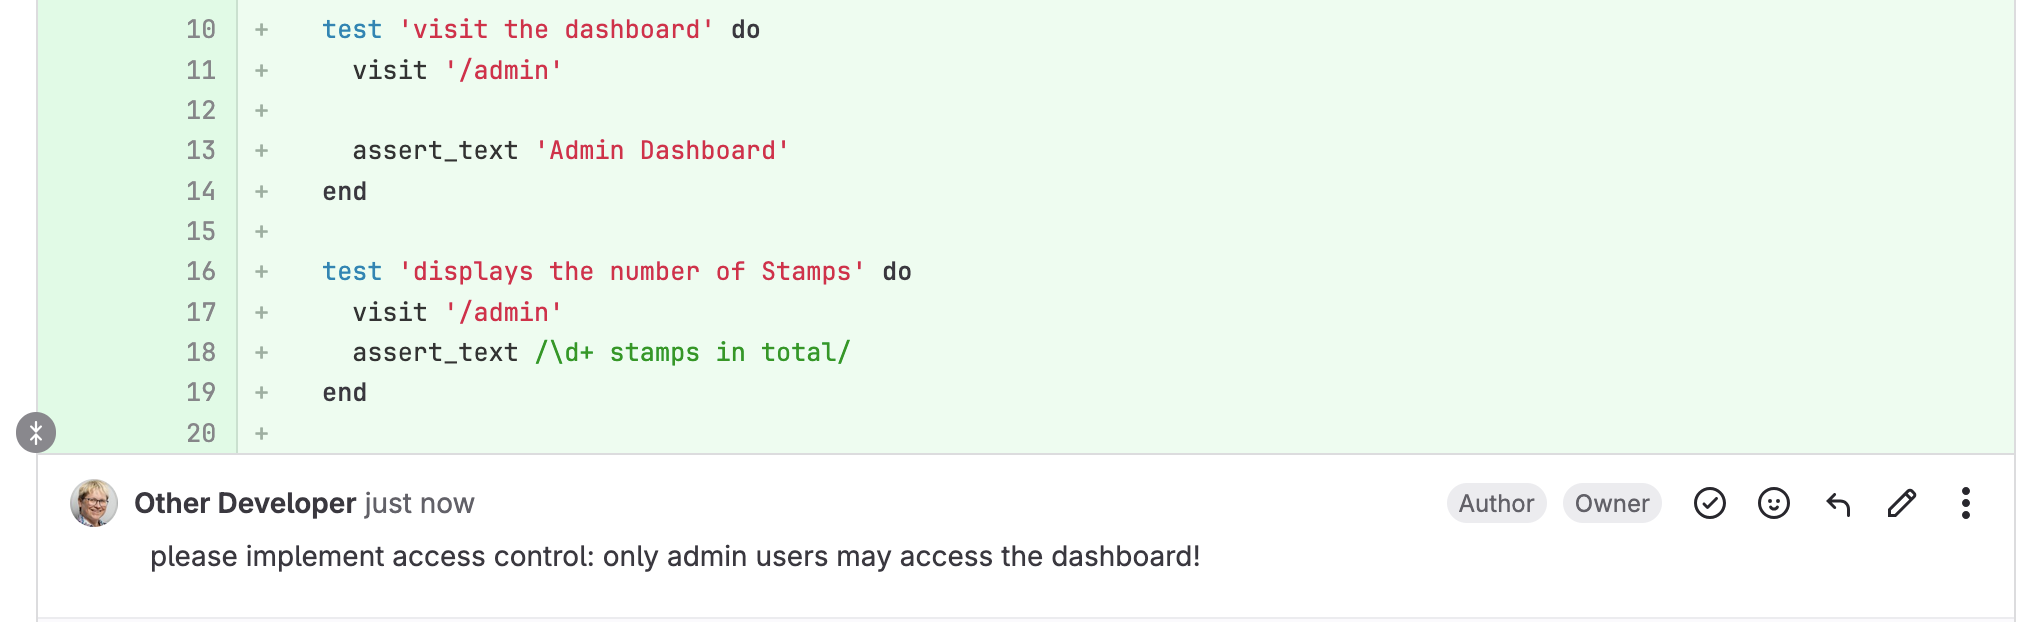
It appears we neglected to implement the third system test on the list. Good that it was caught in the code review! Now we go back to implementation again to fix this.

(this part is not included in the writeup here)

6.4 Example: Deploy to Staging

After the successfull Code Review we are ready to deploy the feature branch to staging. When using dokku, this is done with git on the command line:

git push dokku-staging feature_dashboard_issue_3

In the staging environment the feature can now be tested not just by developers, but also by other team members, like designers, product owners, or the customers.

7 The Issue Lifecycle: End

We have now reached step 5 in the Issue Lifecycle: in the staging environment, the implementation can now be tested in the browser.

  1. Define the Issue: The problem (bug) or new requirement (feature/story) is given a clear description
  2. A developer picks up the issue
  3. Somhow it is implmented (details unclear on this level)
  4. Somehow it is prepared for manual testing (details unclear on this level)
  5. Now the implementation can be tested in the browser, and compared to the issue
  6. If the implmentation is accepted the issue is closed, otherwise it's back to step 2

If the implementation is accepted as a good solution to the issue, it can be deployed to production.

8 Cycles within Cycles

This is a simple version of an iterative software development process.

When you work in existing code bases, in a project that regularly deploys new features, you will use a variation of this process.

Each team, each company will also have their own conventions and standards. There might be a conventions for branch names, for commit messages, for the test coverage needed for a feature to be finished, and so on.