Let's look at a fairly complex web application - the course
management system for a university. How would the code for this
app be organized, if it is written in Ruby on Rails?
The course management system surely deals with courses in some
way.
Rails is organized along the distinction of model - view - controller (MVC).
In our exmple we would find:
an entry in conf/route.rb that configures the mapping of URLs and parameters to the controller
several templates for courses in the folder app/views/courses/
a ruby class in the apps/controllers folder with the class name CourseController
a ruby class in the app/models folder with the class name Course
a relational database in the backend. this database contains a table courses
As a rails programmer you know about all these folders and files. If you are
told that there is a problem in the webpage with url http://myapp.com/courses/5/edit
you immediately
know to look in conf/routes.rb to find out exactly which files are concerned,
but that the most likely canditates are
app/models/course.rb
app/controller/course_controller.b
app/views/course/edit.html.erb
If you have not used a framework before this might feel very restrictive in the
beginning: you can't just make up filenames any way you want, there is a
convention for everything.
You have to stick to the convention if you want to profit from the framework,
it will make your work as a programmer a lot easier.
And you will profit from this convention
every time you look at a new project - you'll instantly know your way around.
Before you can start your first rails project you have
to install ruby and the rails gem on your computer.
A word of warning: Ruby and Rails will work on any Unix, including Mac OS.
To use them on a windows system you need a lot more patience and troubleshooting
ability. So if you are a windows user you might consider running
ruby and rails in a virtual (unix) machine (without GUI) instead.
Make sure you are using a current ruby (>= 2.3) and rails (>= 5.0) before
you proceed:
Another word of warning: rails moves fast. This textbook first written in the fall
of 2012 for rails 3.2, and has been updated every year until fall 2016.
If you are reading this in the far future (which in rails terms means: in late 1017 or later)
you are probably using ruby 3 or later, and rails 6 or later, and this text is not for you!
Before you start your rails project you have to decide on the name (and folder
name) of your application. The name of application cannot easily be changed
afterwards! In the following example we create an app called 'alljokes':
rails new alljokes -T
The last step that was run automatically when creating a new rails project is bundle install.
This will try to look up gems on the internet - if you are not connected
to the internet you will be stuck here. You could try bundle install --local instead,
that might help if the gems are installed on your computer already.
Rails will create a directory structure and about 40 files for you.
Let's start to look at a few of them:
Gemfile - in this file you specify which libraries (gems) your project uses
app
model - contains all the classes of models
view - contains a folder full of templates for every controller
controller - contains all the classes of controllers
config
database.yml - database configuration
routes.rb - configuration of routes
public - the webspace. files in here are accessible without routing
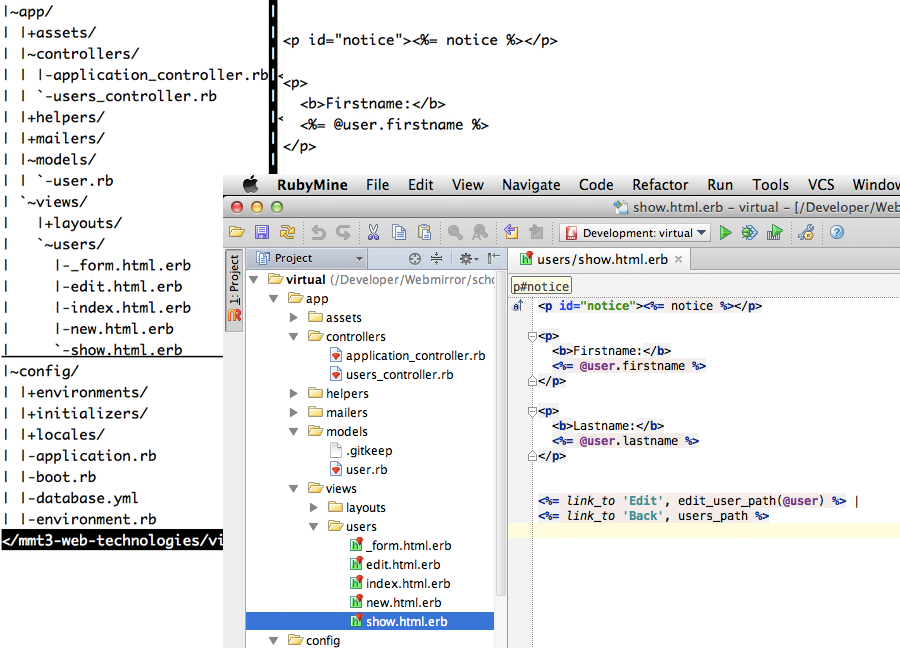
With your code split up into so many different files it is really useful
to haven an editor that not only helps you edit a single file, but that
will also display the directories and files. For example vim with NERDtree
or submline or RubyMine:
Rails comes with a tiny webserver called puma. You start
it in your terminal window (and then you need another window to go on working)
$ rails server
Now you can point your browser at http://localhost:3000/ to find the first
webpage of your app. It's just a dummy page that will vanish once
you add your own pages.
A new rails project is already prepared to be turned
into a git repository: there is a .gitignore file in the main
folder. (If you are using rubymine you could add /.idea to
your .gitignore - that's the directory where rubymine stores
it's configuration. You probably want to keep that private to
each developer.
Create a new repository and commit in the current status:
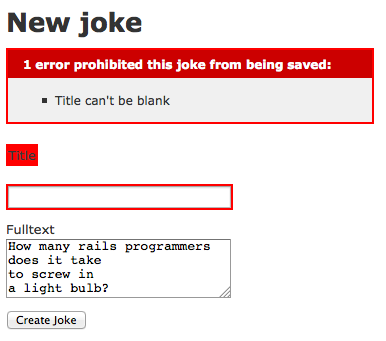
A scaffold helps you build something. In Rails a scaffold
helps you generate code according to the conventions.
In our application we want to store jokes. Let's generate
the scaffold for that: We want a model called joke with
two attributes: a (short) title and a (longer) fulltext.
When we call the scaffold generator on the commandline
we need to specify the name of the model, and the names (and types)
of the attributes. short strings / varchars do not need a type at all.
This is ruby code to generate a database table. You can see the
two attrivbutes you specified when you called the generator. There is
also a line t.timestamps that will add two more attributes to the
table: created_at and updated_at. Rails handles these to values
automatically.
You can run the migration (tell ruby to actually create the table) by
typing in rails db:migrate on the command line:
This actually created the table in a sqlite3 database called
db/development.sqlite3. As a side effect it also dumped the current
database schema into db/schema.rb and created a two extra tables
schema_migrations and ar_internal_metadata.
We built a first rails app and ran it locally on our own machine.
You should now have an overview over the most important files
and a first impression of ruby code (used in controllers, models)
and embedded ruby (erb) used in the views.